Carefully wash the outside of the eggs with cold water, then separate saving the whites (it is easier to separate the yokes and whites when the eggs are cold) Lightly covered the egg whites and let rest until they are room temp. This down time is perfect for prepping the rest of the steps and work space. Line a cookie sheet or baking try with parchment paper or a silicone oven mat, lightly flouring the paper or mat will sometimes help to make sure they don’t stick once fully baked. Select the tip(s) needed and set up the piping bag, we used a star shape for the trees.
Some suggest hand whisking in a copper bowl is the only way while others prefer an electric hand mixer, we used our Kitchenaid mixer with very tasty results, less mess and faster prep time.
Once the eggs are at room temp slowly turn the mixer on to medium and mix until the egg whites become so foamy and frothy that they filled with tiny bubbles that really look like wet foam. This took about 8-10 minutes on medium with our Kitchen-aid stand mixer. Very slowly start to add in the pre sifted confectioners’ sugar, just a couple small spoonful’s at a time, you should then wait a minute before adding more. This will roughly take another 6 to 10 minutes. You should quickly start to see a change in consistency, add in pistachio extract and green food coloring. You can stop mixing once the mixture can hold its shape in a stiff peak (this is easy to see as soon as you turn off the mixer and lift up the whisk attachment on the mixer.
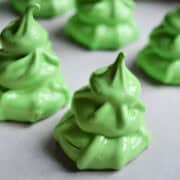
You can now carefully fill the piping bag with the meringue mixture. I like to do this by placing the piping bag in a large heavy glass that you can fold the outside of the piping bag over on. This allows you to use two hands to fill the bag. Give the piping bag a quick twist and hold firmly so the meringue will not leak out of the open end of the bag. Once baked the meringues will only be slightly larger, so you may pipe them fairly close to one another. The overall baking time depends on the size so be careful to be as consistent as possible when piping. Start by piping one round piece, pulling the pipe tip away, just as you would for any other meringue. Follow with two more layers just like this (or more if you prefer). I did one full tree before moving onto the next, if you find it easier, you can do all of the first layers, follow with the second layers… and do each layer as a set. This is up to you.
All ovens work differently keep a close eye on the temperature, you’ll want the oven to be at 200 degrees for the duration of the baking time. A separate oven thermometer that can stay in might be a great purchase if you have an inconsistent oven or if you are still getting to know yours. These three layer trees will take 1.5 to 2 hours depending on their overall size. The base on ours was about 1.5 inches across. Keeping them on the smaller side will help them keep their shape and cut down on baking time.
Allow the meringues to fully cool then store for up to a week in an air tight container.